If you have any questions or doubt at any point of the installations, please ask for our assistance from our Support team. We strongly advice that you seek the advice of a qualified electrician before carrying out any work on your wiring. MyJioOnline products uses both 230v mains voltage and 24v low voltage. Damaged components can occur if this is not observed.
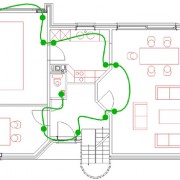
A bus system consists of modules connected to each other. Each module has its own processor, which is programmed for a specific function and exchange of information with other modules connected to the bus. A bus power supply is required for bus communications.
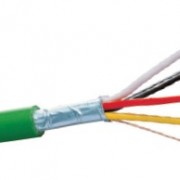
Bus cable consists of two parts, one for the extra low voltage side 24v and the other part allow the communications between them.
This means that all your lights should be individually cabled directly to your electrical panel; For load switching/dimming you will have to use appropriately rated power cables, i.e. 1.5mm, 2.5mm, Twin & Earth etc.
Max length of bus cable is 1200 meters, but multiple subnets can be connected together so there really is no practical limit on the number of devices.
When you are looking to buy KNX cable, look for the KNX logo. All KNX certified equipment has been tested and certified to meet this high standard and only equipment meeting this can carry the logo. This ensures the quality, reliability and guaranteed compatibility of all KNX devices and equipment.
The KNX cable also known as TP2 cable features two twisted pairs of solid conductor with a foil screen and tinned copper drain wire in a green LSHF jacket. It has been tested and certified as being suitable for use in KNX systems and bears the KNX logo.
For internal installations where the cable may be seen, the white KNX cable is ideal. The cable is exactly the same in construction as the standard green 2 pair cable but has a white LSHF sheath with yellow printing.
Conductor Solid bare copper wire
Insulation Polyvinylchloride (PVC)
No. Of Cores 4 cores (two twisted pairs)
Colour Code Red, Yellow, White, Black
Drain Wire Solid bare copper wire
Screen Aluminium over the yellow and white
Outer Jacket (PVC) Green or White
There are different types of wall panels, but all back boxes are the same, each back box require 47mm uk style 35mm as a min. These back panels also have paint cover plates. The face plates are the click into place for a very quick installations. the bus cable is strip back to 5mm and inserted into a push fit connector.

The most typical use of HDL for heating control is via the use of our DLP panels. Each DLP panel has an inbuilt heating program which can be used with underfloor heating, underfloor cooling, radiator heating, and even electric heating.
The DLP has an inbuilt temperature sensor which it can use, optionally in conjunction with in-floor probes or other DLP panel temperature readings, in order to regulate the temperature in that zone. Temperature control is typically achieved by connecting a relay module to valve actuators on the heating manifold. The DLP uses PID control to regulate the temperature, which is the industry standard for intelligent thermostatic control, and ensures an even temperature even when the heating speed is slow (most water-based underfloor systems).
For most projects, however, we recommend taking advantage of the HDL Heating Controller. This device runs 6 independent thermostatic programs and features 6 inbuilt relays for connection to valve actuators. We recommend installing this device at the manifold itself.
There are many different types of heating systems, and HDL Heating Control is primarily designed to regulate the temperature. The control of the actual boiler is always done by the qualified heating engineer or electrician, and the HDL system provides the necessary signals (dry contact, or 240v live signal) where required to provide a “heat demand”.
Many modern systems with zoned heat often benefit from more than one pump in the property. If there is more than one pump, then further consideration should be given to the design. Please consult with your heating engineer.
We recommend following our wiring guidelines which can be obtained by contacting us.
When using HDL Heating Controllers, it is important to remember to set each one to use its own “Internal Clock”, and to set only one of them to “broadcast time”. It is also important to remember to set the daylight saving time in accordance with the recommendations shown in the software. If you have a logic module in the system, then please make sure that “broadcast time” is switched OFF in the Logic Module, as only one device in the system should be broadcasting the time. Using the above setting ensures that the heating modes (NORMAL, DAY, NIGHT, TIMER & AWAY) work properly.
We will be adding further information to this website all the time. It is worth bearing in mind that consideration needs to be given to the following:
Positioning of DIN Rail Panels
Audio
Controlling different Lighting Loads
Choosing the correct power supply size
Consideration for Blinds and Curtains
Underfloor Probes & Temperature Sensors
SSelection of Smart Sensors
Third party devices and security systems
